Deploying Your Django Application On AWS Elastic Beanstalk – A Step By Step Guide
Prem Pratap Singh, Technology Consultant, Calance | 27 Sep 2023
Dive into the world of deploying Django web applications with ease, efficiency, and confidence. In this series, we'll unravel the intricate process of deploying your Django projects on AWS Elastic Beanstalk, a pivotal platform for scalable and reliable web hosting.
Each part of this series is crafted to provide you with step-by-step guidance and insights to ensure your deployment journey is smooth and successful. In Part 1, we'll cover the first four points on our list, setting a strong foundation for your Django project's deployment.
Welcome to a comprehensive exploration of Django deployment, designed to empower you with the skills and knowledge needed to conquer the AWS Elastic Beanstalk environment.
Stay tuned for more insightful parts in this series as we uncover the full potential of deploying Django web applications using the efficiency of GitHub Actions.
Objective of the Blog Series
By the end of this blog series, you will gain the expertise to:
- Understand fundamentals of AWS Elastic Beanstalk
- Seamlessly deploy your Django Application from the cli to Elastic Beanstalk
- Configure Amazon S3 for robust support of static and media files
- Integrate Amazon RDS (Postgres 13.7 version) with your application
- Securely integrate an SSL certificate with your Django Application
What is Elastic Beanstalk?
Elastic Beanstalk is a fully managed cloud computing service provided by Amazon Web Services (AWS) that makes it easier to deploy, manage, and scale applications in the cloud. With Elastic Beanstalk, developers can simply upload their application code and Elastic Beanstalk automatically handles the deployment, scaling, monitoring, and management of the infrastructure that runs the application.
Elastic Beanstalk supports a variety of programming languages, including Java, Python, Ruby, Node.js, .NET, and more. It also integrates with popular development tools and services, such as Git, Eclipse, and Visual Studio.
Elastic Beanstalk automatically provisions the necessary infrastructure resources, such as Amazon Elastic Compute Cloud (EC2) instances, Elastic Load Balancing, Amazon Relational Database Service (RDS) instances, and manages the underlying infrastructure for you. This allows developers to focus on writing code and delivering new features, rather than worrying about infrastructure management.

Setting Up Your Project
You have the option to either clone your existing project or use a sample Django application available on GitHub.

Installing EB CLI
You can install the EB CLI in two ways: either by using the EB CLI INSTALLER or by using pip. For this tutorial, we'll opt for the EB CLI INSTALLER method. Please click on the provided link to initiate the installation process using the EB CLI INSTALLER. After installation, you can confirm it by running the 'eb - version' command.
You can install the EB CLI in two ways: either by EB CLI INSTALLER or pip; in this tutorial we will opt for EB CLI INSTALLER.
Please follow the link to initiate the installation process via EB CLI INSTALLER
After installation, you can confirm it by running the eb-version command.
Initialize Elastic Beanstalk
“init” command for Elastic Beanstalk (EB) is used for the purpose of initializing a new Elastic Beanstalk application, environment, or workspace within your local development environment. It helps to create a new Elastic Beanstalk project and establish a local directory structure that can be used to develop and deploy your application on AWS.
When you initiate the 'eb init' command, you'll be presented with a sequence of prompts and inquiries
1. Default Region

2. Application Name: Press Enter to select and work with number option and enter the desired name for your application

3. Select the Platform, as we will be using Docker from the list.
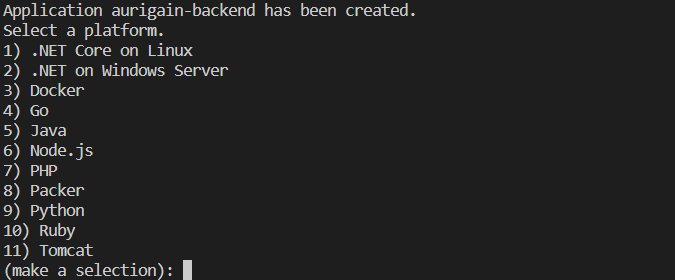
4. Select a Platform Branch, we will use default for Docker.

5. SSH access to connect to EC2 instance, say “YES” on the prompt
KEYPAIR: Create a new keypair or use any existing keypair you would like to use. After this process is completed, it will create a config.yml file inside folder. elasticbeanstalk

When you run the eb init command, it creates the .elasticbeanstalk directory and a configuration file named config.yml inside it. This file contains the configuration settings for your Elastic Beanstalk environment and application.
Let's explore the purpose of each section within the config.yml file:
Branch-defaults: This section specifies the default environment to use for each branch in your Git repository. In the example you provided, the your-elasticbeanstalk-branch-name branch is set to use the web-dev environment.
Environment-defaults: This section specifies the default configuration settings for each environment. In the example provided, the web-dev environment is set to use a null value for branch and repository.
Global: This section specifies global configuration settings for your Elastic Beanstalk application. In the example provided, the application_name is set to web, the default_platform is set to Docker running on 64bit Amazon Linux 2, and the default_region is set to ap-south-1.
Deploying Application
Command: eb create
Answer the prompted question as below:
Environment Name: Select the default
Load Balancer: Select Application Load Balancer
Spot Fleet Request: No
When you run the eb create command, Elastic Beanstalk will create a number of AWS resources and perform several processes to set up your application environment. Here's an overview of what happens:
- Elastic Beanstalk will create a new AWS Elastic Beanstalk environment for your application. This environment will include resources such as EC2 instances, Elastic Load Balancers, and Auto Scaling groups.
- Your code will be zipped up and uploaded to a new S3 Bucket.
Application Deployment Status
After the deployment process concludes, you can verify its status by executing the following command: eb status

ENVIROMENT CONFIGURATION
Create a new folder in your root of the project, name it “.ebextensions”, create a file inside the folder name it 01_django.config and point our Django setting to DJANGO_SETTING_MODULE

Now go to the console and search for Elastic Beanstalk in AWS Search, select the environment and then click on the domain to access your application.

TESTING APPLICATION
Now, we can test the application to ensure it’s working properly.
To Test the application, enter your URL into the browser.
https://abc.test.net/api

CHECKING LOGS
You can select logs tab from request logs - select logs you want to look for.

SSL INTERGRATION
Integrating an SSL certificate with your Django Application for secure communication involves several steps, starting from domain registration to configuring your AWS resources. Below are the detailed steps:
- Domain Registration:
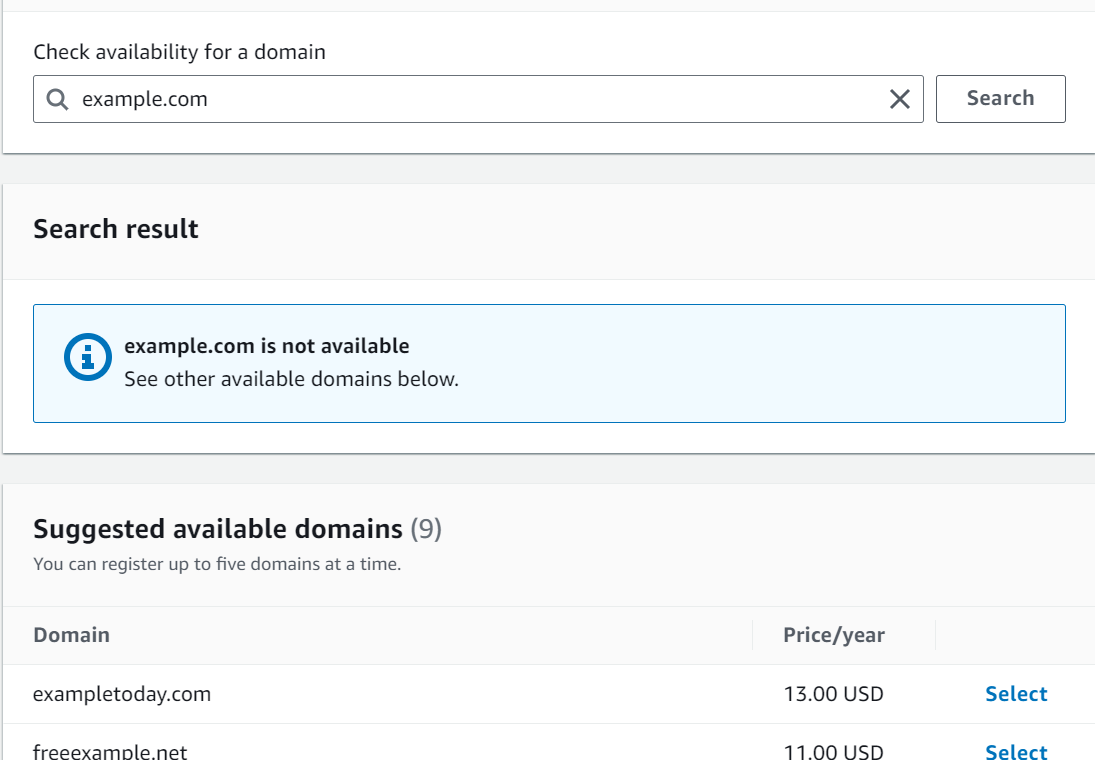
Choose a domain registrar (e.g., Amazon Route 53, GoDaddy, Namecheap) and register your domain (e.g., example.com).
Click on Register Domain

Search for the domain name you want to register for and check for the availability, select and proceed to checkout.
Setting Up Hosted Zone
- Open the Route 53 Service:
Once you are logged in, go to the AWS Management Console and open the Route 53 service. You can find it under the "Networking & Content Delivery" section.
2.Create Hosted Zone:
In the Route 53 dashboard, click on "Hosted zones" in the left sidebar. This will show a list of your existing hosted zones (if any). To create a new hosted zone:
Click the "Create hosted zone" button.

3.Configure Hosted Zone:
You will be prompted to configure the hosted zone:
Domain Name: Enter the domain name for which you want to create the hosted zone (e.g., example.com).
Type: You can choose between a "Public hosted zone" (for domains that need to be publicly accessible on the internet) or a "Private hosted zone" (for internal, private use within a Virtual Private Cloud). For most public websites, choose "Public hosted zone."
Comment: This is an optional field for adding a description or comment about the hosted zone.

- Create Hosted Zone:
After configuring the details, click the "Create hosted zone" button to create the hosted zone.
- DNS Name Servers:
Once the hosted zone is created, AWS Route 53 will display the name servers (NS records) for your hosted zone. These name servers are what you need to configure in your domain registrar's settings to make Route 53 the authoritative DNS service for your domain.
You should see a list of name server records like ns-1234.awsdns-12.org. Make note of these name servers.
- Update Domain Registrar Settings:
Log in to your domain registrar's website (where you registered your domain) and navigate to the DNS settings or domain management section. Look for an option to update your domain's name servers (NS records).
Replace the existing name servers with the ones provided by Route 53 in step 6.
Wait for DNS Propagation:
NOTE: It may take some time (typically up to 48 hours) for the DNS changes to propagate across the internet. During this period, your domain may resolve to either the old DNS servers or the new Route 53 name servers, depending on the DNS cache of various DNS providers.
Configure Record
To access website using our domain, we need to add two alias records of type A: one for our main domain (example.com) and the other for subdomain (www website version):
- On Hosted zone page click Create record

- Switch Alias toggler

- Record type - A
- Route traffic to - Beanstalk, then select region and environment

- Click Create record
Adding Domain to the Elastic Beanstalk Environment
Elastic Beanstalk environment
Click on ‘Configuration’ from the left pane and edit the Load Balancer settings.

Within listeners, click on ‘Add Listener’. For the port, enter 443 (the port for HTTPS); for the protocol, select HTTPS. Select the certificate that you just created in the Certificate Manager from the ‘SSL certificate’ dropdown.
For the ‘SSL Policy’, select ELBSecurityPolicy-2016-08. The default process can be left as ‘default’ unless you have some other processes defined. Click on ‘Add’.

Disable the default port 80 HTTP listener. For the default listener, turn off the Enabled option

Configure the default process to HTTPS. Select the default process, and then for Actions, choose Edit. For Port, type 443. For Protocol, select HTTPS. Adjust the health check based on your application path and click on save.

Conclusion
We have covered essential steps to deploy a Django application with the utmost security and scalability using AWS Elastic Beanstalk. We began by understanding the fundamentals of AWS Elastic Beanstalk and its numerous advantages for Django application deployment, such as easy scaling, load balancing, and monitoring.
We then walked through the process of deploying a Django application to AWS Elastic Beanstalk using the command-line interface (CLI), ensuring a streamlined and efficient deployment experience. With Elastic Beanstalk's simplicity and automation, we've made it easier than ever to get your Django application up and running in a production-ready environment.
Security was a paramount concern, and we explored how to integrate an SSL certificate with your Django Application, enabling secure communication and building trust with your users. By securing your application, you're not only safeguarding sensitive data but also improving your site's ranking in search engine results.
Next Blog
In our next blog post, we will take your deployment process to the next level by incorporating the power of GitHub Actions. We'll show you how to set up an automated deployment pipeline that allows for continuous integration and continuous deployment (CI/CD) of your Django application on AWS Elastic Beanstalk. With this approach, you can ensure that your application stays up to date, secure, and always ready to meet your users' needs.
So, stay tuned for our next blog, where we dive into the world of CI/CD for Django applications on AWS Elastic Beanstalk using GitHub Actions, taking your deployment process to a new level of efficiency and reliability.
Custom IT Solutions
Leverage our capabilities and insights to accelerate your digital transformation
